CHAM 2018-01-22
Circuit Hacking Arduino Mondays - January 22, 2018
THIS DOCUMENT: https://www.noisebridge.net/CHAM_2018-01-22
Getting Started
If you have never worked with an Arduino before, you'll first need to install the Arduino IDE (Integrated Development Environment).
Download and install the Arduino IDE
  Windows:  https://www.arduino.cc/en/Guide/Windows
  Mac OS X: https://www.arduino.cc/en/Guide/MacOSX
  Linux:    https://www.arduino.cc/en/Guide/Linux
  Web IDE:  https://create.arduino.cc/editor
  You may need to install a separate USB driver to connect with the Arduino board. Speak with one of us.
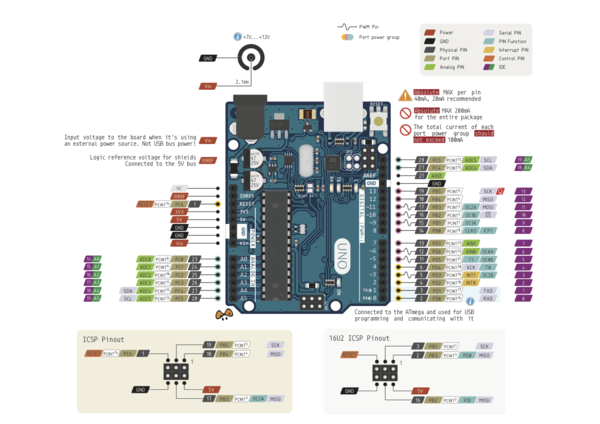
Arduino Pinout
Test that your setup works - Blink the Arduino's onboard LED
Select "Blink from the Arduino IDE's "File > Examples > 01. Basics" menu, or load the code from the following page:
https://www.arduino.cc/en/Tutorial/Blink
Fun with LEDs
Let's add one LED to your Arduino breadboard now, and make it blink
You can either modify the "Blink" example above to use a different pin, or you can follow another example sketch-
https://learn.sparkfun.com/tutorials/sik-experiment-guide-for-arduino---v32/experiment-1-blinking-an-led
Blink without the "delay()" function
A slightly more sophisticated technique- load File > Examples > 02. Digital > BlinkWithoutDelay
PWM: Pulse-width modulation
Use a digital "~" pin to output a signal which dims and brightens using pulse-width modulation (powering the pin for short bursts)
Load File > Examples > 02. Digital > Fading
Multiple LEDs at once
Now let's add multiple LEDs to your breadboard, and make them blink-
https://learn.sparkfun.com/tutorials/sik-experiment-guide-for-arduino---v32/experiment-4-driving-multiple-leds
Controlling LEDs with Outside Events
Adding inputs to control the LEDs: switches
https://learn.sparkfun.com/tutorials/sik-experiment-guide-for-arduino---v32/experiment-5-push-buttons
Intermediate
Communicating between two Arduinos with Packet Radios
Packet Radios! The nRF24L01 is a digital radio chip that Arduinos can use to send and receive data.
Requires two people with an Arduino apiece. Ask Kevin, J, Asim or Joe for a radio module.
Find a partner and follow this document: http://howtomechatronics.com/tutorials/arduino/arduino-wireless-communication-nrf24l01-tutorial/
Advanced
Packet Radios^2! Communicate with more than one other radio
Send an ACK (acknowledgement) message after receiving a message. Let's sender know a receiver got a message. This constitutes bidirectional communication, which http://tmrh20.github.io/RF24/GettingStarted_CallResponse_8ino-example.html
THIS DOCUMENT: https://www.noisebridge.net/CHAM_2018-01-22
