Flaschen Taschen
| Noisebridge | About | Visit | 272 | Manual | Contact | Guilds | Stuff | Events | Projects | Meetings | Donate | E |
| Guilds (Volunteer) | Maintainers | Meta | Code | Electronics | Fabrication | Games | Sewing | Music | AI | Neuro | Philosophy | Funding | Art | Security | Ham | WGs | E |
| Art | Artbridge | Decorating Noisebridge | Posters | Wall Art | LED Art | LED Signage | ANSI Art | Projection | Payphone | NoiseCanvas | E |
| LED Art | Noisebridge Sign | Welcome Sign | Donation Sign | Flaschen Taschen | Noise Square Table | Big LED Screen | Circuit Chandelier | Mooninite | Patterns | Wall Screens | LED | E |
 You are standing at the Flaschen Taschen, a glowing display wall showing animated artwork on a grid of LED lit bottles in a grid of black crates. Its blinking lights are reflected in the gleaming adjacent Noise Square Table, forming the fabled "FlaschenTable". You see instructions on how to send graphics to the Flaschen Taschen remotely. EXITS: Hackitorium, Shop > |
![]()
What's the project?

The Award Winning Flaschen Taschen is a 10’ by 9’ (3m x 2.75m) video display made out of clear glass bottles, milk crates, RGB LED strings (with a total of 1575 LEDs), and a controller board. Each bottle is capped with a single addressable RGB LED. The bottoms of the bottles act as lenses for the emitted light. The project has a German name as homage to c-base’s Mate-Light project. After seeing Mate-Light at Chaos Communication Congress, we were inspired to build a similar project at Noisebridge to present at the 2016 Maker Faire.
Another inspirational build is the Muro de botellas project.
Our goal was to have it completed for Maker Faire 2016 to be shown as part of our booth and we were two weeks ahead of schedule. After the MakerFaire, the display will be permanently installed within Noisebridge and possibly made available for events.
Our code and hardware that drives up to 16 LED strips from a Raspberry Pi is on Flaschen-Taschen github. We only need 9 strips in this project, one for each crate column. The update rate of the full FlaschenTaschen display is up to 160fps!

Here is the first view of the completed project


Network protocol and Utilities to send content
The network protocol is quite simple: essentially send a PPM picture (P6) in a UDP packet to ft.noise:1337.
For instance, try the following all in the comfort of you shell (in bash, to be precise, that conveniently provides the /dev/udp pseudo-path):
bash$ jpegtopnm myimage.jpg | stdbuf -o64k pnmscale -xysize 45 35 > /dev/udp/ft.noise/1337
Flaschen Taschen accepts a footer that defines an offset in x,y space as well as a layer z index. To write images which cover the default demo visualization, you can send a higher -index by appending this footer after your sends. We still need to make sure to send everything in one packet, so on the shell this is a bit awkward as we first have to store the full content temporarily in a file. For instance, to position the image at (x=0 y=0, z=5):
bash$ ( jpegtopnm myimage.jpg | pnmscale -xysize 45 35; echo "0 0 5" ) > /tmp/tmp-out ; cat /tmp/tmp-out > /dev/udp/ft.noise/1337
There are utilities in the repository to send and scroll arbitrary images (including animated gifs), videos or text, so the above, sending an image to layer 5, would be as simple as:
bash:flaschen-taschen/client$ ./send-image -l5 myimage.jpg
There is a C++ and Python client library that you can use right away to send images to Flaschen Taschen including a couple of examples. It is simple to write your own client in any language that supports networking (See protocols section in documentation). There is also a Node.js module flaschenode in the npm registry (https://www.npmjs.com/package/flaschenode). Or you can clone it from github or help hack on it if somehow you have node working but don't like npm (https://github.com/mpmckenna8/flashenode).
See all the details here: https://github.com/hzeller/flaschen-taschen
FlaschenToy
One of the examples in the Flaschen Taschen github is FlaschenToy.
This is a Flask app that sends the contents of a WebGL canvas to the Flaschen Taschen. The web page takes GLSL code from a text area input, and displays it on the Flaschen Taschen using the the ShaderToy conventions.
It is currently hosted on noisebridge you can try it at: http://noisebridge.noise/FlaschenToy
I've not added it to the to the startup scripts, so if that site is dead you can restart on by running sudo run.sh in ~/github/flaschen-taschen/examples-api-use/flask (you'll need to be logged in as noisebridge and have the admin password)
Try pasting some of the shaders from the ShaderToy page: https://www.shadertoy.com/browse into the text area
Most examples will just work. E.g. this meta ball example: https://www.shadertoy.com/view/Mss3WN
The code is currently in my fork of the project (will get merged into main page in the future): https://github.com/griffin2000/flaschen-taschen
List of Devices at Noisebridge running the Flaschen Taschen Protocol
- FlaschenTaschen - Host: ft.noise
- Kleine FlaschenTaschen - Host: ftkleine.noise
- Library bookshelves - Host: bookcase.noise
- Noise Square table - Host: square.noise
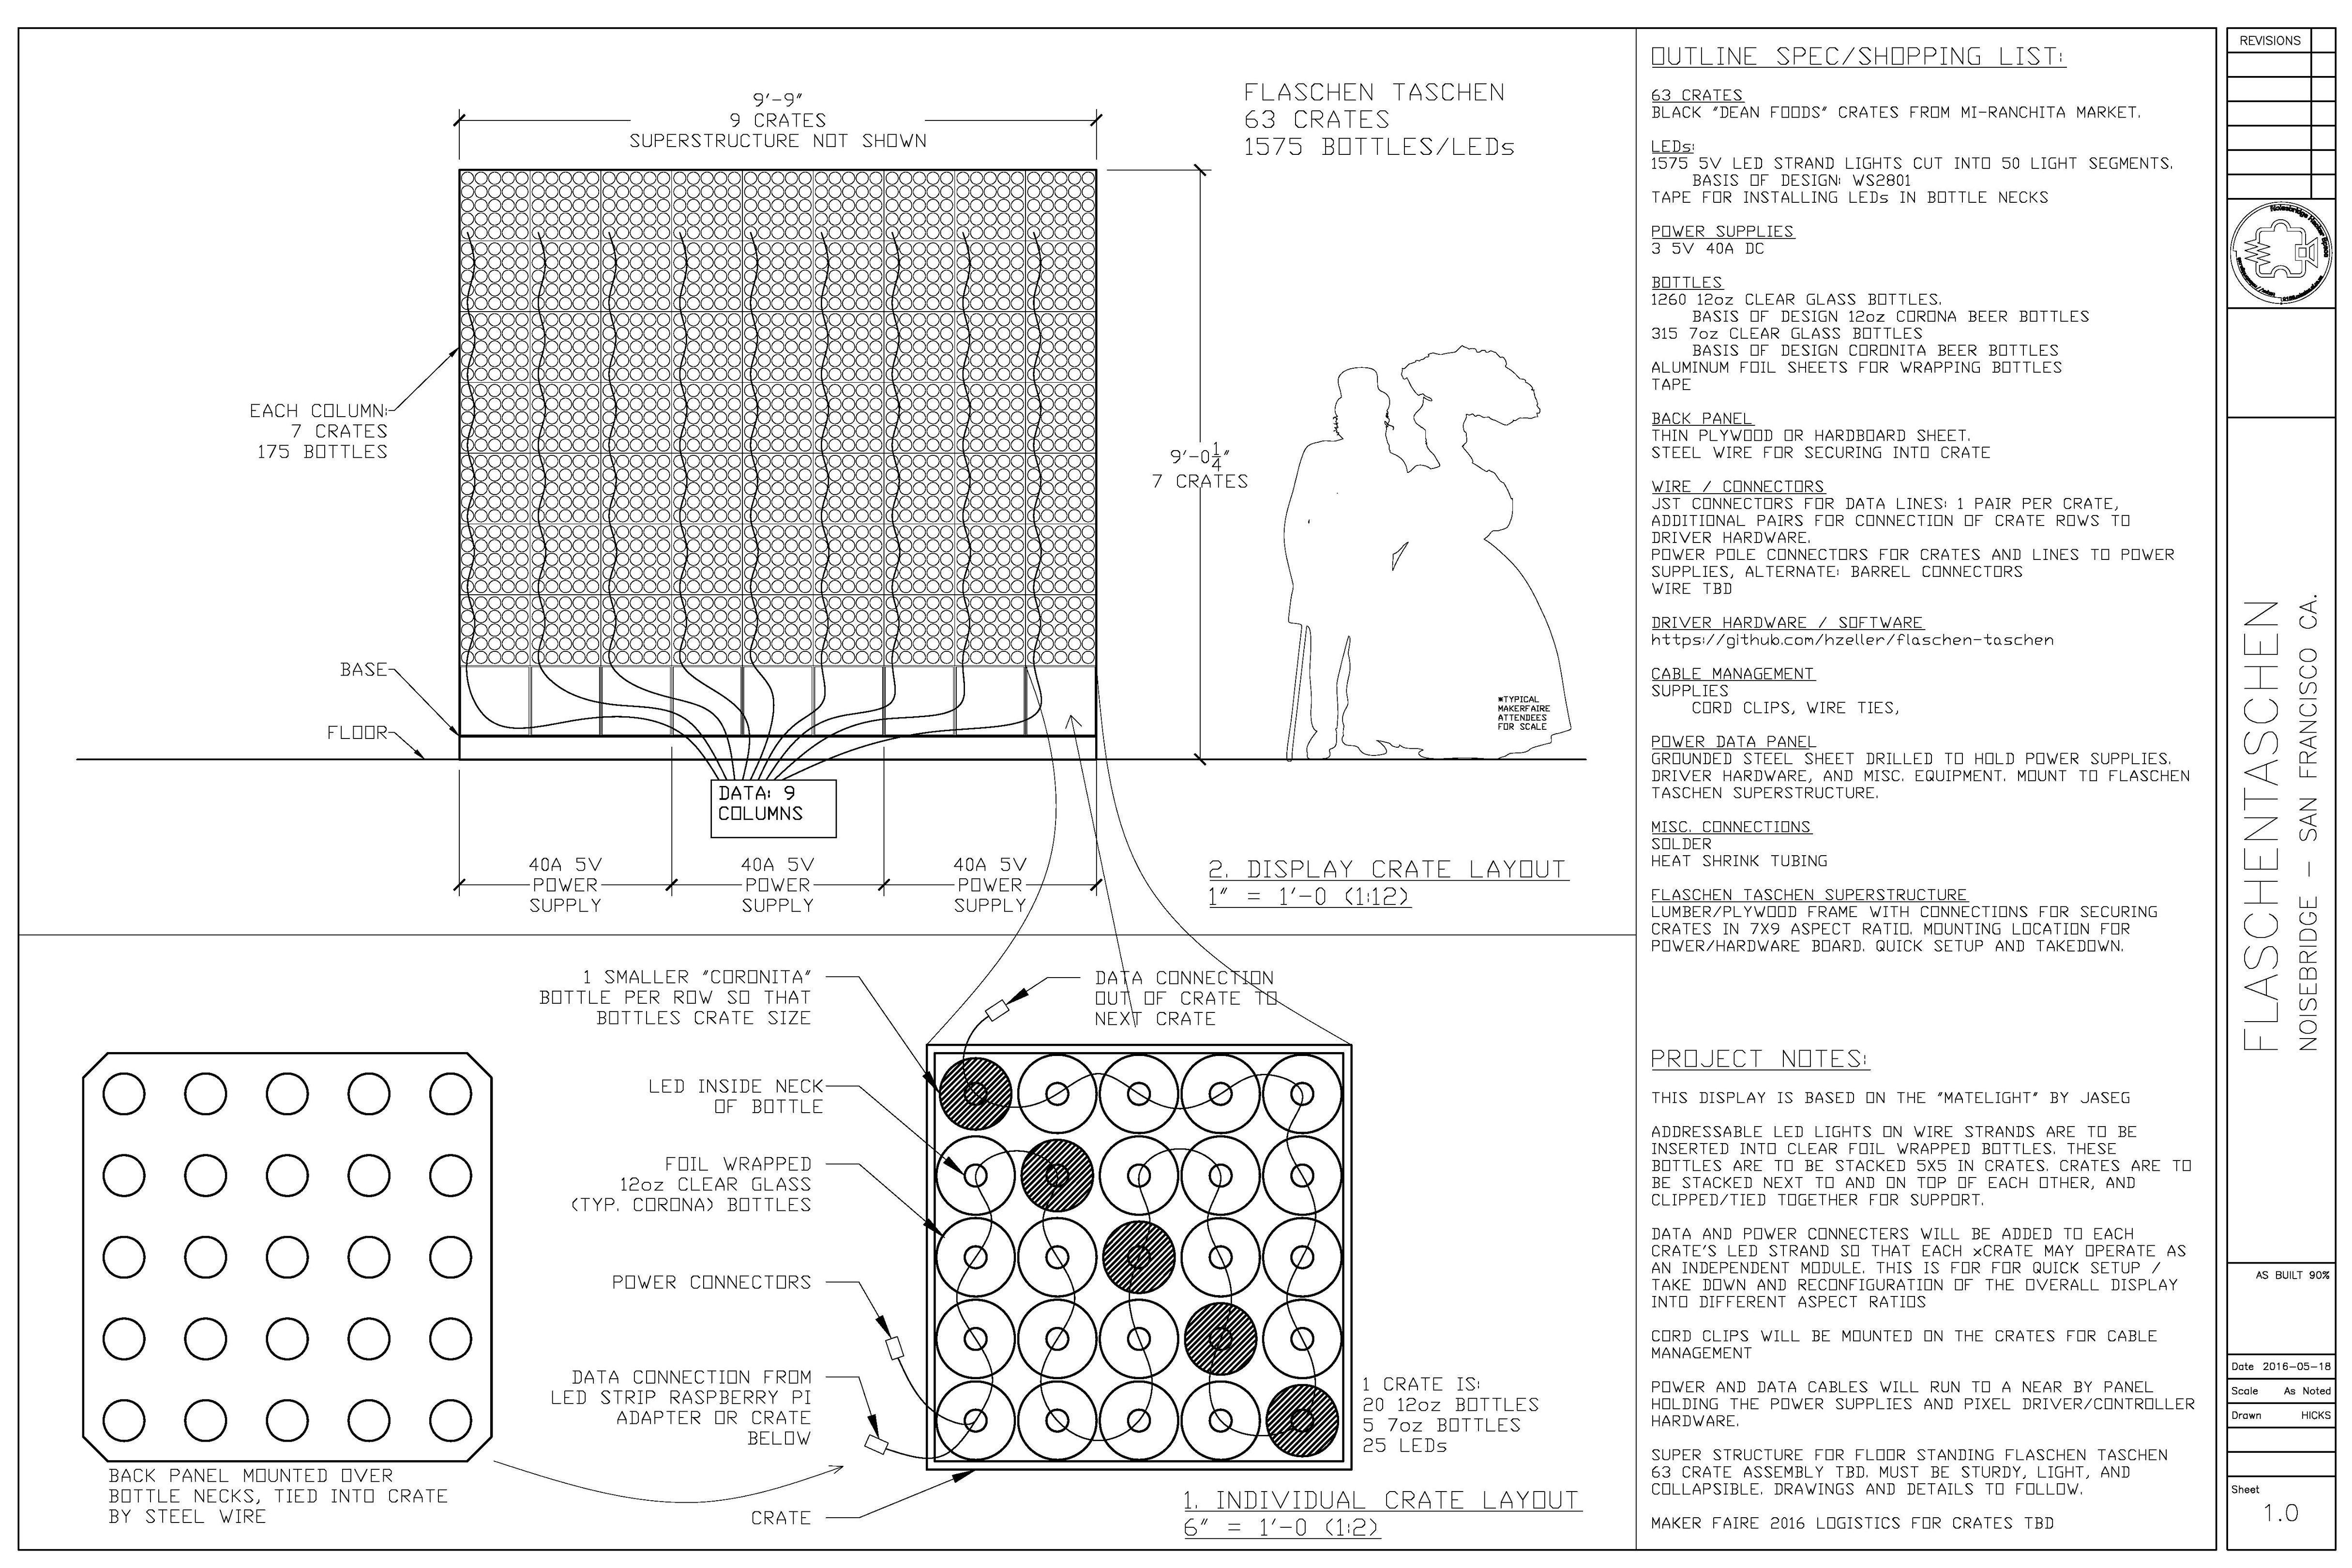
Current Mechanical Design Documentation
This .PDF file is the current drawing set. Please take a look.
https://noisebridge.net/images/8/8c/2016_0518_FlaschenTaschen_Sheet1-0_AsBuilt_Noisebridge.pdf

Rough Take-down Procedure
Flaschen Taschen takedown and setup notes: (does not include electronics) 2016-06-13 draft by Jarrod
! Take pictures of how things are setup for reference!
! Take care to collect all the parts as you disassemble, there are many parts and some are small, but important!
- 1_Remove all power cables from rear. Make note of how they are run to the power supplies
- 2_Disconnect all data connections, remember there are typically two per crate. Take a photo of how they are routed to the breakout board on the raspberry pi.
NOTE: The crates have an orientation. Remember this. Take a photo
- 3_Remove the 2” green tie down strap. This is tricky there are two metal latches in line with the handles that need to be pulled in tandem to release the ratchet. While pulling on the latches it may be necessary to add tension to the tie down to get it to release, since we do not tighten it very much during install.
- 4_The wooden vertical supports are connected to four of the top crates by a wood screw
Remove these screws. The supports are kind of floppy and are really only meant to be supportive in a direction parallel to the face of the display During setup any forward or backward lean of the display can be adjusted slightly by screwing these supports back on to the top crates at a distance that pushes them forward or pulls them backward
- 5_Once the cables and supports are disconnected the RELEASABLE cable ties can be removed from the crates. Please do not cut the ties, as you will need them to set the display back up
- 6_Stack the crates in stacks of 4. This is a good height to move with a hand truck. Make sure that the power jacks and date cables are not hanging over the edges of each crate before another crate is placed on top of it, so as to not damage the wires and connectors.
NOTE: The bottom row of crates do not have bottles with LEDs, so as to provide a space for the hardware and lift the display of the floor for improved visibility.
NOTE: The two end crates have 2x4 supports in them. The others have plywood. The assembly is not symmetrical, but each crate has at least one support. Together they are almost exactly as long as the base. These also get zip tied together, but they are harder to tie.
- 7_Stack up the base crates. These are also good for holding all the hardware, zip ties, bolts (in a bag), and cables for transport.
- 8_Remove the vertical supports from the base by unscrewing them. (iirc: this is done with a 7/16” wrench/socket.) Have someone hold the vertical supports while unscrewing. Keep all parts and set aside. NOTE how those washers are used. It is important that bolts not be able to rip through the wood.
- 9_Flip the base over. There are three bolts in the center that hold it together. Remove these.
Congratulations, You have now turned the Flaschen Taschen into parts for shipping.
The setup procedure is essentially the reverse of this. Just remember:
- A_Bring tools. Wrenches for the bolts, a screwdriver for the tops of the vertical supports, and a ladder.
- B_The crates have an orientation. At the forward edge (display side) of each crate there is Velcro. The hook side should be on the top and the loop side should be on the bottom. This is typical for all crates except the base which only have the hook side Velcro on the top.
- C_Do not tighten the tie down very much. Its purpose is merely to squeeze the crates together so they can’t move individually. The zip ties do most of the work
- D_Try to align the forward faces of the crates as best as possible, but realize that it will never come out perfect. If a column is going out of vertical the crates above can be installed a little fore or aft of the face of the display to make up for it.
- E_People have already sent images of genitalia to be displayed on the screen, so get over it.
hacking
the blinky RGB LED's are driven by a WS2801 chip, that uses a clock (green) and data (white) line, that are operated similarly to APA102's, but are not identical in practice.
custom code's by teh'x taht served as table ornamite for Mitch's interview of C.M. past 10th anniversary at NB.
µPython running on a ESP8266 driving random overflow noise on a milk crate of 5x5 RGB's.
# 2 CM w/<3

import time
from machine import Pin
from apa102 import APA102

clock = Pin(14, Pin.OUT) # set GPIO14 to output to drive the clock
data = Pin(13, Pin.OUT) # set GPIO13 to output to drive the data

apa = APA102(clock, data, 25)

def randomByte():
        return int.from_bytes(uos.urandom(1), 'little')

def randomPixel():
        return [randomByte(), randomByte(), randomByte(), 31]

def loop():
        while True:
                for j in range(25):
                        apa[j] = randomPixel()
                        apa.write()
                        time.sleep_ms(round(randomByte()/10))

loop()
Web interface
If you are at Noisebridge at 272 Capp and on our wireless, you can go to http://led-square:4444/ and use the code examples at https://github.com/noisebridge/ft-web to mess with the LED display(s)! Thanks to dana for getting this running again!
Flaschen Taschen on a Raspberry Pi
Build and run FT on a Pi.
Preparing SD Card
Use Raspberry Pi imager to install OS and create a username of noisebridge to log into the Pi.
Building FT
sudo apt-get update
sudo apt-get install g++ make
sudo apt-get install libgraphicsmagick++-dev
sudo apt-get install libavcodec-dev libavformat-dev libswscale-dev libavutil-dev

mdir GitHub
mkdir noisebridge
cd noisebridge

git clone https://github.com/noisebridge/flaschen-taschen.git
cd flaschen-taschen/server
make
mkdir -p ~/bin
cp ft-server ~/bin/
cd ~/GitHub
mkdir cgorringe
cd cgorringe
git clone https://github.com/cgorringe/ft-demos.git
cd ft-demos
git submodule update --init --recursive
make
cp black ~/bin
cp blur ~/bin
cp fractal ~/bin
cp hack ~/bin
cp kbd2midi ~/bin
cp life ~/bin
cp lines ~/bin
cp matrix ~/bin
cp maze ~/bin
cp midi ~/bin
cp nb-logo ~/bin
cp plasma ~/bin
cp quilt ~/bin
cp random-dots ~/bin
cp sierpinski ~/bin
cp sierpinski_rain.py ~/bin
cp simple-animation ~/bin
cp simple-example ~/bin
cp words ~/bin
cd ft/client
make send-text send-image
cp send-text ~/bin/
cp send-image ~/bin/
There are problems with the build for send-video as it is using API which has since been deprecated and removed from the library. The code will need to be revised.
Configuring FT
sudo vim /etc/systemd/system/ft-server.service
sudo systemctl daemon-reload
sudo systemctl enable ft-server.service
sudo systemctl start ft-server.service
ps aux | grep ft-server | grep -v grep
/etc/systemd/system/ft-server.service:
[Unit]
Description=Flaschen Taschen Server
After=network.target

[Service]
ExecStart=/home/noisebridge/bin/ft-server -D 160x96 --layer-timeout 15
WorkingDirectory=/home/noisebridge/ft
Restart=always
User=noisebridge

[Install]
WantedBy=multi-user.target
Start:
sudo systemctl start ft-server.service
Status:
sudo systemctl status ft-server.service
View logs:
journalctl -u ft-server.service
Create Backup Image
diskutil list
dd if=/dev/rdiskX of=/path/to/backup.img bs=1m
Run backup.sh to create a backup image.
====================================

The Flaschen Taschen Hardware Updates (4-6-2026)
The Current State: The Flaschen Taschen is currently in the mode of being transitioned to mount against the south wall of the 1st floor of 272 Capp street.
It is currently in a wooden frame a few feet from the wall, undergoing some wire repairs before getting a more permanent mount.
This is a repair / update log to document the current state and some recommendations for hardware (not software) repairs.
The Current challenges:
- Noisebridgians have reported occassional glitching. Julius aptly notes a need to mount the “brains” of the project on the side, where it can be accessed (currently located behind). There is some cable extensions needed to accomplish this brave task.
- Some cable connections look broken or dodgy
note: many brightly-colored plastic easter eggs were discovered amongst the beer bottles


The Current Hardware:
Github: https://github.com/hzeller/flaschen-taschen
https://www.noisebridge.net/images/d/d6/2016_0518_FlaschenTaschen_Sheet1-0_AsBuilt_Noisebridge.jpg1. WS2801 LEDs (5V) (1,575 of them): https://cdn-shop.adafruit.com/datasheets/WS2801.pdf
2. Power: 3x open frame Mean Well 5V @40 PSUs. Model: LRS-200-5
https://www.amazon.com/LRS-200-5-Price-Switching-Supply-MeanWell/dp/B0B6HSLSQQ
3. LED Connectors: JST-SM-4 clip on connectors (only 3 wires used, since +5V supplies by barrel connectors):
https://www.amazon.com/BTF-LIGHTING-Connector-Extension-Solderless-Controller/dp/B0DCB8VS89
Wiring info: https://github.com/hzeller/flaschen-taschen/blob/master/doc/wiring.md
4. Raspberry Pi (likely a Pi 2 Model B):
https://www.raspberrypi.com/products/raspberry-pi-2-model-b/
5. Custom hardware board (“hat”) dubbed “spixels”, documented here:
https://github.com/hzeller/spixels
A replacement can be ordered directly here:
https://oshpark.com/shared_projects/BTdhLFc3
The hat is basically a bunch of transcievers (74HCT245) which seem to be configured as a 1-direction buffer. This is connected to the SPI output on the Raspberry Pi connects.
Schematic is here:
https://github.com/hzeller/spixels/blob/master/hardware/pi-adapter-16/README.md
The +5VDC seems to be distributed via barrel connectors (2.1mm?) instead of the SPI bus outputs of the “spixels” hat, which is why only 3 wires are used from the JST-SM-4 connectors.

The Problems:
1. Currently there are a few wire connections which seem dodgy and held in only by layers of electrical tape, which loses its “stickiness” over time with heat.
2. Reports of occassional glitching
3. The “spixels” had uses a 0.1” (2.54mm) style connector, which has no locking mechanism and is notorious for being flimsy (usually good for breadboarding but not much else). Some connectors are broken, others are wiggling loose.
4. The Raspberry Pi and hat have no case. They are exposed to the elements and whatever dust or garbage falls on them.
5. Some of the barrel power connectors appear to be missing or damaged.
Recommendations for Repairs and Improvements:
1. Extend JST-SM-4 cables so that Raspberry Pi + hat can be side-mounted and accessed for repairs and upgrades
2. Fix all questionable wiring in back, including taped up barrel connectors
3. Convert all 0.1” (2.54mm) connectors to soldered plugs or JST-style locking connectors
4. Remake / upgrade “spixels” hat to be:
- a) custom3-pin only (no power to JST-SM-4 needed)
- b) include chonky powercord (if needed) to the supply, either a barrel or a XT30
- c) breakout outputs to thicc, durable locking plugs
- d) Include a status display of some kind? (OLED like SSD1306?)
- e) do bus monitoring with INA219?
5. Make 3D printed enclosure for Raspberri Pi and “spixels” with screw mount tabs
6. Mount PSUs on their side, since they are open frame design, to reduce risk of bits of things falling in them.
Pics of the hardware challenges: https://archive.org/details/flaschen-taschen-4-6-2026